
In a series of three posts, I share my road towards a PM sensor system with help of Arduino and the SPS30 Sensirion PM sensor. This first post: getting the sensor data on a computer.
Nowadays, more and more Do-It-Yourself air quality sensors come available. A huge advantage of this is the price: while plug and play particulate matter (PM) instruments are (at least) €300, PM sensors can already be bought for under €20. The two main disadvantages are 1) you have to build it yourself, and 2) the reliability of the instrument might be unknown.
Because of the cost-advantage, I chose to discover these options, despite of the two disadvantages. Across three posts, I describe the development of a PM sensor system, based on the Sensirion SPS30 PM sensor, with help of Arduino. For me, the starting point was absolutely zero knowledge on this topic, hence the posts will cover the full learning curve. If you have more knowledge on this topic, it might well be that you can give me relevant advice on how to improve the eventual sensor measurement set.
1 Materials
Below a list of materials, with links to randomly selected suppliers.
- Arduino Mega 2560
- USB-B cable
- Sensirion SPS30
- JST ZHR 5P female cable
- 2 10K resistors
- 4 jumper cables
- breadboard
2 Software
I installed the Arduino IDE, downloaded a SPS30 library, and placed it in my Arduino folder (Documents/Arduino/libraries).
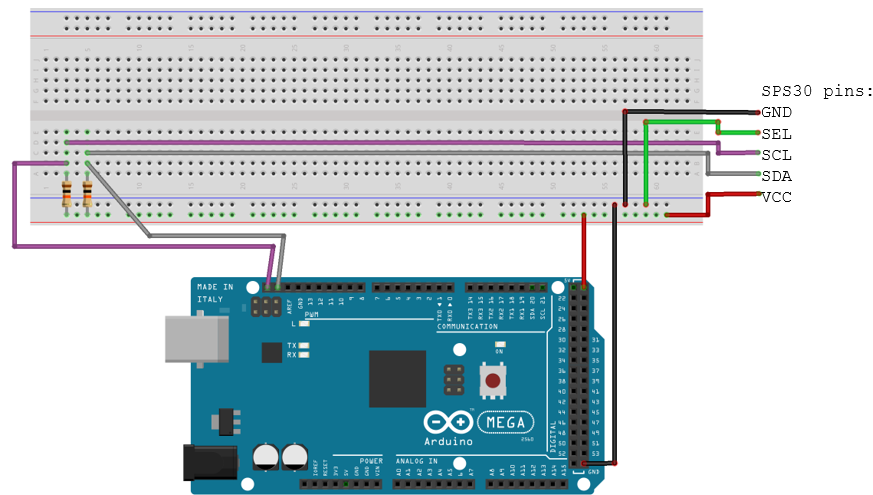
3 Connections
The SPS30 has five pins: GND, SEL, SCL, SDA and VCC. I connected these pins according to the below schematic (where the two 10K resistors are connected to the SDA and SCL wiring and 5V as ‘pull-up resistors’).
4 Starting the sensor
I connected the Arduino board to my laptop, and in the Arduino IDE, I selected the right COM port (Tools -> Port).
In the example sketch sps30/Example1_sps30_BasicReadings, I edited the following in the sketch:
- Line 161: #define SP30_COMMS I2C_COMMS
I uploaded the sketch, clicked on the serial monitor and put the baud rate on 115200. After hitting enter, I get PM readings on my screen.
5 What’s next?
Now I have PM data on the screen. The data is out there: but how to save it? Post two: storing the data on an SD card.