String Version = "0-5"; //Sketch version
String NodeID = "SPSAXX"; //Instrument ID
String TTNtype = "ABP"; //Type of connection to TTN
///////////////////////include libraries//////////////////////////////////////
#include <SPI.h>
#include <Wire.h>
#include <EEPROM.h>
#include <lmic.h>
#include <hal/hal.h>
#include <DS3231.h>
#include "SparkFunBME280.h"
#include "SdFat.h"
#include "sps30.h"
//***************************************************************************************************
// TTN settings. Change the keys according to the configuration in TTN. *
//***************************************************************************************************
// LoRaWAN NwkSKey, network session key
static const PROGMEM u1_t NWKSKEY[16] = { 0x00, 0x00, 0x00, 0x00, 0x00, 0x00, 0x00, 0x00, 0x00, 0x00, 0x00, 0x00, 0x00, 0x00, 0x00, 0x00 };
// LoRaWAN AppSKey, application session key
static const u1_t PROGMEM APPSKEY[16] = { 0x00, 0x00, 0x00, 0x00, 0x00, 0x00, 0x00, 0x00, 0x00, 0x00, 0x00, 0x00, 0x00, 0x00, 0x00, 0x00 };
// LoRaWAN end-device address (DevAddr)
static const u4_t DEVADDR = 0x00000000 ; // <-- Change this address for every node!
// Empty callbacks - only filled when using OTAA
void os_getArtEui (u1_t* buf) { }
void os_getDevEui (u1_t* buf) { }
void os_getDevKey (u1_t* buf) { }
//***************************************************************************************************
// Global data. *
//***************************************************************************************************
// Constructors
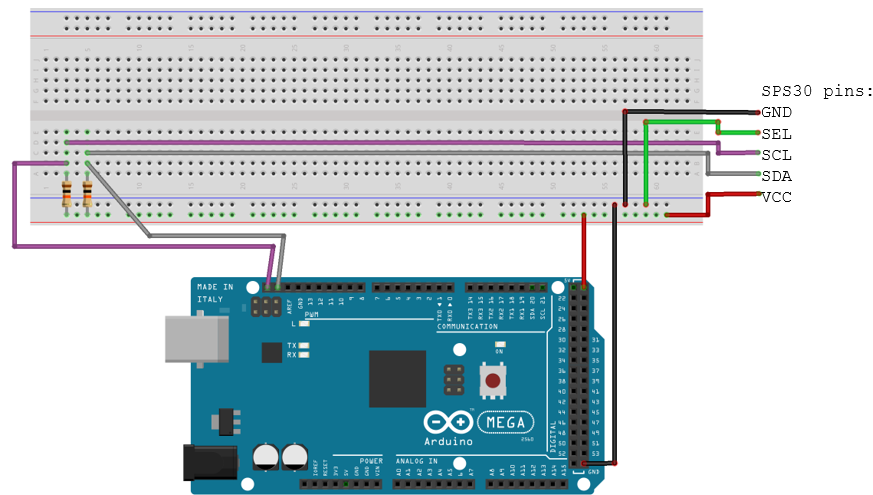
SPS30 sps30;
BME280 bme280;
DS3231 Clock;
//SD pin definitions
const uint8_t SOFT_MOSI_PIN = 11;
const uint8_t SOFT_MISO_PIN = 12;
const uint8_t SOFT_SCK_PIN = 13;
const uint8_t SD_CHIP_SELECT_PIN = 53;
SdFatSoftSpi<SOFT_MISO_PIN, SOFT_MOSI_PIN, SOFT_SCK_PIN> sd;
// LMIC Pin mapping
const lmic_pinmap lmic_pins = {
.nss = 10,
.rxtx = LMIC_UNUSED_PIN,
.rst = LMIC_UNUSED_PIN,
.dio = {2, 6, 7},
};
//SPS030 commands and function prototypes
#define SP30_COMMS I2C_COMMS //SPS030
#define TX_PIN 0 //SPS030
#define RX_PIN 0 //SPS030
#define DEBUG 0 //SPS030
#define PERFORMCLEANNOW 1 //SPS030 cleaning
void ErrtoMess(char *mess, uint8_t r);
void Errorloop(char *mess, uint8_t r);
struct sps_values readSPSdata();
struct sps_values avgSPSdata(int counter, sps_values valIn);
//Empty file and strings
SdFile file;
String dataString;
String timeString;
String spsMassS;
String spsNumS;
String bmeString;
String fileHead = "YYYY-MM-DD;UU:MM:SS;RH;T;PM1mass;PM2.5mass;PM4mass;PM10mass;PM0num;PM1num;PM2.5num;PM4num;PM10num;Partsize";
//Variables
bool Century=false; //DS3231
bool h12, PM, ADy, A12h, Apm; //DS3231
byte ADay, AHour, AMinute, ASecond, ABits; //DS3231
byte year, month, date, DoW, hour, minute, second;//DS3231
int pm25, rh, temp, counter; //Data storage and counter for average
int restartEvent = 1; //to indicate a restart / reset has happened
int CleanNeed = 1; //Always 1, then at the chosen hour SPS will do 1 cleaning. For the remainder of that hour it will be 0.
int seqnoUp; // To store the TTN upload framecounter
int eeAddress = 0; // Writing address in EEPROM
const unsigned TX_INTERVAL = 300; // #seconds between each send job
static uint8_t mydata[] = {0,0,0,0,0,0}; // Structure for the data to send over LoRa
static osjob_t sendjob;
//Structures
struct bmeData_t // Stucture for BME data
{
int temperature ;
int rhumidity ;
String bmeString ;
} ;
struct timeData_t // Structure for time data
{
String timeString ;
long timeInYear ;
String month ;
int hour ;
} ;
sps_values spsValues;
bmeData_t bmeValues;
timeData_t timeValues;
//***************************************************************************************************
// Setup and loop. *
//***************************************************************************************************
void setup() {
Serial.begin(115200);
Wire.begin();
Serial.println("Node: " + NodeID + "; Version: " + Version + "; Connection via: " + TTNtype);
pinMode(3, OUTPUT);
EEPROM.get(eeAddress,seqnoUp);
if (seqnoUp<1) {
Serial.println("EEPROM empty; setting seqnoUp as 20 and writing to EEPROM. Do not forget to reset frame counters in TTN.");
seqnoUp = 20;
EEPROM.put(eeAddress,seqnoUp);
}
else {
seqnoUp += 20;
EEPROM.put(eeAddress,seqnoUp);
Serial.println("Writing updated seqnoUP "+String(seqnoUp)+" to EEPROM");
}
setupLMIC();
setupBME();
setupSPS();
}
void loop() {
//After restart, let the loop start at the start of a minute
while (restartEvent==1) {
if (Clock.getSecond() == 0) {
break;
}
}
//For 50 seconds, take average of SPS values
counter = 0;
spsValues = readSPSdata();
float startMeas = millis()/1000;
float endMeas = millis()/1000-startMeas;
while (endMeas < 50) {
if (restartEvent == 0) {
os_runloop_once();
}
spsValues = avgSPSdata(counter,spsValues);
counter = counter + 1;
endMeas = millis()/1000-startMeas;
}
//Take all other values, and prepare them for LMIC and SD
bmeValues = loopBME();
timeValues = loopDS3231();
pm25 = int(spsValues.MassPM2+0.5);
rh = bmeValues.rhumidity;
temp = bmeValues.temperature;
mydata[0] = {highByte(pm25)};
mydata[1] = {lowByte(pm25)};
mydata[2] = {rh};
mydata[3] = {temp};
mydata[4] = {highByte(timeValues.timeInYear)};
mydata[5] = {lowByte(timeValues.timeInYear)};
spsMassS = String(spsValues.MassPM1)+';'+String(spsValues.MassPM2)+';'+String(spsValues.MassPM4)+';'+String(spsValues.MassPM10);
spsNumS = String(spsValues.NumPM0)+';'+String(spsValues.NumPM1)+';'+String(spsValues.NumPM2)+';'+String(spsValues.NumPM4)+';'+String(spsValues.NumPM10)+';'+String(spsValues.PartSize);
if (restartEvent == 1){
restartEvent = 0;
loopSD(fileHead,timeValues.month); //After every restart, a header line is printed
}
//Wait untill full minute, and after that print to SD
while (true) {
os_runloop_once();
if (Clock.getSecond() == 0) {
break;
}
}
timeValues = loopDS3231();
dataString = timeValues.timeString + ";" + bmeValues.bmeString + ";" + spsMassS + ";" + spsNumS;
Serial.print('\n');
Serial.print(dataString);
Serial.print('\n');
loopSD(dataString,timeValues.month); //this loop includes the LED
CleanNeed = cleanNeed(timeValues.hour,CleanNeed); //SPS cleaning check.
}
//***************************************************************************************************
// Setup functions. *
//***************************************************************************************************
void setupLMIC() {
#ifdef VCC_ENABLE
// For Pinoccio Scout boards
pinMode(VCC_ENABLE, OUTPUT);
digitalWrite(VCC_ENABLE, HIGH);
delay(1000);
#endif
// LMIC init
os_init();
// Reset the MAC state. Session and pending data transfers will be discarded.
LMIC_reset();
// Set static session parameters. Instead of dynamically establishing a session
// by joining the network, precomputed session parameters are be provided.
#ifdef PROGMEM
// On AVR, these values are stored in flash and only copied to RAM
// once. Copy them to a temporary buffer here, LMIC_setSession will
// copy them into a buffer of its own again.
uint8_t appskey[sizeof(APPSKEY)];
uint8_t nwkskey[sizeof(NWKSKEY)];
memcpy_P(appskey, APPSKEY, sizeof(APPSKEY));
memcpy_P(nwkskey, NWKSKEY, sizeof(NWKSKEY));
LMIC_setSession (0x1, DEVADDR, nwkskey, appskey);
#else
// If not running an AVR with PROGMEM, just use the arrays directly
LMIC_setSession (0x1, DEVADDR, NWKSKEY, APPSKEY);
#endif
#if defined(CFG_eu868)
// Set up the channels used by the Things Network, which corresponds
// to the defaults of most gateways. Without this, only three base
// channels from the LoRaWAN specification are used, which certainly
// works, so it is good for debugging, but can overload those
// frequencies, so be sure to configure the full frequency range of
// your network here (unless your network autoconfigures them).
// Setting up channels should happen after LMIC_setSession, as that
// configures the minimal channel set.
// NA-US channels 0-71 are configured automatically
LMIC_setupChannel(0, 868100000, DR_RANGE_MAP(DR_SF12, DR_SF7), BAND_CENTI); // g-band
LMIC_setupChannel(1, 868300000, DR_RANGE_MAP(DR_SF12, DR_SF7B), BAND_CENTI); // g-band
LMIC_setupChannel(2, 868500000, DR_RANGE_MAP(DR_SF12, DR_SF7), BAND_CENTI); // g-band
LMIC_setupChannel(3, 867100000, DR_RANGE_MAP(DR_SF12, DR_SF7), BAND_CENTI); // g-band
LMIC_setupChannel(4, 867300000, DR_RANGE_MAP(DR_SF12, DR_SF7), BAND_CENTI); // g-band
LMIC_setupChannel(5, 867500000, DR_RANGE_MAP(DR_SF12, DR_SF7), BAND_CENTI); // g-band
LMIC_setupChannel(6, 867700000, DR_RANGE_MAP(DR_SF12, DR_SF7), BAND_CENTI); // g-band
LMIC_setupChannel(7, 867900000, DR_RANGE_MAP(DR_SF12, DR_SF7), BAND_CENTI); // g-band
LMIC_setupChannel(8, 868800000, DR_RANGE_MAP(DR_FSK, DR_FSK), BAND_MILLI); // g2-band
// TTN defines an additional channel at 869.525Mhz using SF9 for class B
// devices' ping slots. LMIC does not have an easy way to define set this
// frequency and support for class B is spotty and untested, so this
// frequency is not configured here.
#elif defined(CFG_us915)
// NA-US channels 0-71 are configured automatically
// but only one group of 8 should (a subband) should be active
// TTN recommends the second sub band, 1 in a zero based count.
// https://github.com/TheThingsNetwork/gateway-conf/blob/master/US-global_conf.json
LMIC_selectSubBand(1);
#endif
// Disable link check validation
LMIC_setLinkCheckMode(0);
// TTN uses SF9 for its RX2 window.
LMIC.dn2Dr = DR_SF9;
// Set data rate and transmit power for uplink (note: txpow seems to be ignored by the library)
LMIC_setDrTxpow(DR_SF10,14);
LMIC.seqnoUp = seqnoUp;
// Start job
do_send(&sendjob);
}
void setupBME() {
bme280.setI2CAddress(0x76); //check adress with i2c check
if (bme280.beginI2C() == false) //Begin communication over I2C
{
Serial.println("BME280 did not respond. Please check wiring.");
while(1); //Freeze
}
}
void setupSPS() {
// set driver debug level
sps30.EnableDebugging(DEBUG);
// Begin communication channel;
if (sps30.begin(SP30_COMMS) == false) {
Errorloop("could not initialize communication channel.", 0);
}
// check for SPS30 connection
if (sps30.probe() == false) {
Errorloop("could not probe / connect with SPS30.", 0);
}
else
Serial.println(F("Detected SPS30."));
// reset SPS30 connection
if (sps30.reset() == false) {
Errorloop("could not reset.", 0);
}
// start measurement
if (sps30.start() == true)
Serial.println(F("Measurement started"));
else
Errorloop("Could NOT start measurement", 0);
// clean now requested -- at every reset
if (PERFORMCLEANNOW) {
// clean now
if (sps30.clean() == true)
Serial.println(F("fan-cleaning started"));
else
Serial.println(F("Could NOT start fan-cleaning"));
delay(15000);
}
}
//***************************************************************************************************
// Loop functions. *
//***************************************************************************************************
struct bmeData_t loopBME() {
float rhum,temper;
rhum = bme280.readFloatHumidity();
temper = bme280.readTempC();
bmeData_t bmeData;
bmeData.temperature = int(temper+0.5);
bmeData.rhumidity = int(rhum+0.5);
bmeData.bmeString = String(rhum) + ';' + String(temper);
return(bmeData);
}
struct timeData_t loopDS3231() {
int second,minute,hour,date,month,year,temperature;
String monthS;
second=Clock.getSecond();
minute=Clock.getMinute();
hour=Clock.getHour(h12, PM);
date=Clock.getDate();
month=Clock.getMonth(Century);
year=Clock.getYear();
timeData_t timeData;
timeData.timeString = "20" + String(year) + '-' + String(month) + '-' + String(date) + ';' + String(hour) + ':' + String(minute) + ':' + String(second);
timeData.timeInYear = int(((month-1)*(31*24*6) + date*24*6 + hour*6 + minute/10 + second/(60*10))-32768)+32768; //#10 minutes in the year, minus 32768 to make full use of arduino int capacity.
monthS = String(month);
if (monthS.length()==1) {
monthS="0"+monthS;
};
timeData.month = "20" + String(year) + monthS;
timeData.hour = hour;
return(timeData);
}
void loopSD(String dataS, String month) {
//create a fileName per month, and as such, a new file per month
String extension = ".txt";
String fileNameStr = NodeID + "_V" + Version + "_" + month + extension;
char fileName[fileNameStr.length()+1];
fileNameStr.toCharArray(fileName, sizeof(fileName));
if (!sd.begin(SD_CHIP_SELECT_PIN)) {
sd.initErrorHalt();
}
if (!file.open(fileName, FILE_WRITE)) {
sd.errorHalt(F("open failed"));
}
file.println(dataS);
Serial.println("printed to SD");
digitalWrite(3, HIGH); //when successfully written to SD: switch LED on
file.close();
delay(500);
digitalWrite(3, LOW); //switch LED off
}
int cleanNeed(int hourCheck,int Need) {
if (hourCheck == 3) {
if (Need == 1) {
// clean now requested
if (PERFORMCLEANNOW) {
// clean now
if (sps30.clean() == true)
Serial.println(F("fan-cleaning started"));
else
Serial.println(F("Could NOT start fan-cleaning"));
}
Need = 0;
delay(15000);
}
}
else {
Need = 1;
}
return(Need);
}
//***************************************************************************************************
// Other functions. *
//***************************************************************************************************
// LMIC functions
void onEvent (ev_t ev) {
Serial.print(os_getTime());
Serial.print(": ");
switch(ev) {
case EV_SCAN_TIMEOUT:
Serial.println(F("EV_SCAN_TIMEOUT"));
break;
case EV_BEACON_FOUND:
Serial.println(F("EV_BEACON_FOUND"));
break;
case EV_BEACON_MISSED:
Serial.println(F("EV_BEACON_MISSED"));
break;
case EV_BEACON_TRACKED:
Serial.println(F("EV_BEACON_TRACKED"));
break;
case EV_JOINING:
Serial.println(F("EV_JOINING"));
break;
case EV_JOINED:
Serial.println(F("EV_JOINED"));
break;
case EV_RFU1:
Serial.println(F("EV_RFU1"));
break;
case EV_JOIN_FAILED:
Serial.println(F("EV_JOIN_FAILED"));
break;
case EV_REJOIN_FAILED:
Serial.println(F("EV_REJOIN_FAILED"));
break;
case EV_TXCOMPLETE:
Serial.println(F("EV_TXCOMPLETE (includes waiting for RX windows)"));
if (LMIC.txrxFlags & TXRX_ACK)
Serial.println(F("Received ack"));
if (LMIC.dataLen) {
Serial.println(F("Received "));
Serial.println(LMIC.dataLen);
Serial.println(F(" bytes of payload"));
}
// Schedule next transmission
os_setTimedCallback(&sendjob, os_getTime()+sec2osticks(TX_INTERVAL), do_send);
break;
case EV_LOST_TSYNC:
Serial.println(F("EV_LOST_TSYNC"));
break;
case EV_RESET:
Serial.println(F("EV_RESET"));
break;
case EV_RXCOMPLETE:
// data received in ping slot
Serial.println(F("EV_RXCOMPLETE"));
break;
case EV_LINK_DEAD:
Serial.println(F("EV_LINK_DEAD"));
break;
case EV_LINK_ALIVE:
Serial.println(F("EV_LINK_ALIVE"));
break;
default:
Serial.println(F("Unknown event"));
break;
}
}
void do_send(osjob_t* j){
// Check if there is not a current TX/RX job running
if (LMIC.opmode & OP_TXRXPEND) {
Serial.println(F("OP_TXRXPEND, not sending"));
} else {
// Prepare upstream data transmission at the next possible time.
LMIC_setTxData2(1, mydata, sizeof(mydata), 0);
seqnoUp = LMIC.seqnoUp ;
EEPROM.put(eeAddress,seqnoUp);
Serial.println("Writing updated seqnoUP "+String(seqnoUp)+" to EEPROM");
serial_printf(Serial,"Packet [%2x %2x %2x %2x %2x %2x] queued \n",
mydata[0],mydata[1],mydata[2],mydata[3],mydata[4],mydata[5]);
}
// Next TX is scheduled after TX_COMPLETE event.
}
// SPS030 functions
struct sps_values readSPSdata() {
uint8_t ret, error_cnt = 0;
struct sps_values val;
// loop to get data
do {
ret = sps30.GetValues(&val);
// data might not have been ready
if (ret == ERR_DATALENGTH){
if (error_cnt++ > 3) {
ErrtoMess("Error during reading values: ",ret);
}
delay(1000);
}
// if other error
else if(ret != ERR_OK) {
ErrtoMess("Error during reading values: ",ret);
}
} while (ret != ERR_OK);
return(val);
}
struct sps_values avgSPSdata(int counter, sps_values valIn) {
struct sps_values valAvg; //Structure in which to store average values
struct sps_values valTemp; //Structure in which to store temporal values
if (counter == 0) {
valAvg = valIn;
}
else {
valTemp = readSPSdata();
valAvg.MassPM1 = (valIn.MassPM1 * (counter - 1) + valTemp.MassPM1) / counter;
valAvg.MassPM2 = (valIn.MassPM2 * (counter - 1) + valTemp.MassPM2) / counter;
valAvg.MassPM4 = (valIn.MassPM4 * (counter - 1) + valTemp.MassPM4) / counter;
valAvg.MassPM10 = (valIn.MassPM10 * (counter - 1) + valTemp.MassPM10) / counter;
valAvg.NumPM0 = (valIn.NumPM0 * (counter - 1) + valTemp.NumPM0) / counter;
valAvg.NumPM1 = (valIn.NumPM1 * (counter - 1) + valTemp.NumPM1) / counter;
valAvg.NumPM2 = (valIn.NumPM2 * (counter - 1) + valTemp.NumPM2) / counter;
valAvg.NumPM4 = (valIn.NumPM4 * (counter - 1) + valTemp.NumPM4) / counter;
valAvg.NumPM10 = (valIn.NumPM10 * (counter - 1) + valTemp.NumPM10) / counter;
valAvg.PartSize = (valIn.PartSize * (counter - 1) + valTemp.PartSize) / counter;
}
return(valAvg);
}
void Errorloop(char *mess, uint8_t r)
{
if (r) ErrtoMess(mess, r);
else Serial.println(mess);
Serial.println(F("Program on hold"));
for(;;) delay(100000);
}
void ErrtoMess(char *mess, uint8_t r)
{
char buf[80];
Serial.print(mess);
sps30.GetErrDescription(r, buf, 80);
Serial.println(buf);
}
// Print formatting function
void serial_printf(HardwareSerial& serial, const char* fmt, ...) {
va_list argv;
va_start(argv, fmt);
for (int i = 0; fmt[i] != '\0'; i++) {
if (fmt[i] == '%') {
// Look for specification of number of decimal places
int places = 2;
if (fmt[i+1] >= '0' && fmt[i+1] <= '9') {
places = fmt[i+1] - '0';
i++;
}
switch (fmt[++i]) {
case 'B':
serial.print("0b"); // Fall through intended
case 'b':
serial.print(va_arg(argv, int), BIN);
break;
case 'c':
serial.print((char) va_arg(argv, int));
break;
case 'd':
case 'i':
serial.print(va_arg(argv, int), DEC);
break;
case 'f':
serial.print(va_arg(argv, double), places);
break;
case 'l':
serial.print(va_arg(argv, long), DEC);
break;
case 'o':
serial.print(va_arg(argv, int) == 0 ? "off" : "on");
break;
case 's':
serial.print(va_arg(argv, const char*));
break;
case 'X':
serial.print("0x"); // Fall through intended
case 'x':
serial.print(va_arg(argv, int), HEX);
break;
case '%':
serial.print(fmt[i]);
break;
default:
serial.print("?");
break;
}
} else {
serial.print(fmt[i]);
}
}
va_end(argv);
}